When I moved to my new house, the bathroom was already painted a light blue color and the wall entering into it was in my bedroom was painted that color.
I didn't hate the color, but it was going to clash horribly with the black, red, white theme I had currently in my room. So I had to come up with a new theme. Where does anyone these days turn for inspiration?!?...Pinterest of course.... I found this bedroom and absolutely loved it!
This lady has amazing eye and style, I love her entire blog. When you have a moment check it out. You will definitely feel inspired.
http://downtoearthstyle.blogspot.com/?m=1
So with this picture as my inspiration I was off to recreate a bedroom with this sort of feel. I wanted it to feel cozy and clean. I also wanted it to be more girly than my previous bedroom.
First order of business was to make some sort of headboard. I like the wood headboards that look worn and country. My lovely dad volunteered to make me a headboard. He bought 6 fences planks at home depot. He sanded them, painted them white, then grey and then sanded so some of the white would show thru. He then attached all of the planks to each other with two boards backing boards. His theory behind this was that instead of drilling multiple holes into the wall I would only need two. Genius. My mom made me a burlap "Love" sign and gave me some old knobs to hang on the headboard. I need to re-thread the love banner so that it is only going thru one string instead of two.


Next I wanted a shelf/mantle above the headboard. My boys had bunk-beds in our apartment but did not want them in our new place. So I had extra wood support beams that worked as a shelf. I bought very inexpensive shelf brackets at home depot to mount the shelf on. Luckily during this same time, Michaels was having an awesome sale and I was able to get the candles and the candle holders I placed on top of it for less than .40 cents each. The candles are not real they are the flameless kind. They really light up the room nicely. I love them.


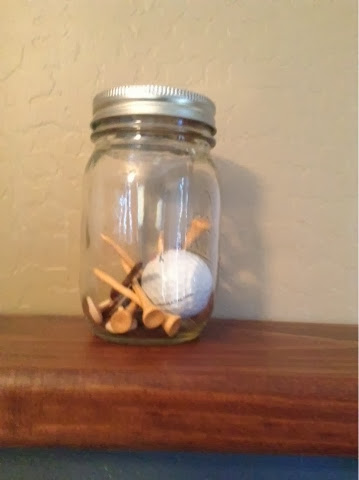
I love mason jars. I wish I could think of more ways to incorporate them in all of my decor. My boyfriend uses them in his kitchen. He also brings over his super healthy smoothies in them. I think they make him look cooler. Mason jars are very hip and so is he =). Anyway I added a mason jar on each side of the candles on the shelf. Even though we do not live together I wanted to make "his" side of the bed in his style. He is a golfer and is always leaving his tees, tokens, and sometimes balls around. I did not realize it until I put it in his mason jar, but I have got quite the collection.
For my mason jar I put rhinestones in it. I mean really what girl doesn't like sparkle?!?
The night stands are re-purposed as well. The one on the left I found in my moms house. She has amazing style and loves to decorate. I am usually first in line waiting for her hand-me-downs. This one I believe she got at Bombay. She also has a random collection of lace and doilies so I took one for this stand and then also one for my bedspread. I will explain the bedspread in a bit. I enjoy this necklace holder as well.
The other side was a jewelry box/chest. We removed the legs from the bottom so that is was not to tall. On it is a picture of me and my boyfriend and another small mason jar. In the jar is more random golf things and his watch. The only thing I do not like about using this jewelry stand as a night stand is that only the top drawer is really functional. I do not own or wear a lot of jewelry so I don't have a use for such a large stand.
Behind each night stand I wanted it to look unison. Since the jewelry stand is taller than the night stand I added a small shelf behind the night stand. On it was a small trinket I found at Michael's and a sign I painted white to match my new room.
I made the chevron pictures on each side of the bed. I downloaded a template, penciled my area and then painted.
I always buy canvas from Micheal's when they are having a sale or when it is in the clearance isle. Sometimes an entire 6 pack will be in the clearance isle because one of the canvas' has a small hole on it.
In front of my bed is one of my favorite pieces of furniture I own. My trunk. I have used as a toy chest, a coffee table, and now and the end of my bed. I love it. My mom went on a shopping spree when I was in high school and bought 3 or 4 trunks. Since black has always been a favorite color of mine I always loved this one. I wanted it as soon as I saw it. She told me no, which rarely happens. Anyway when I was about 25 she finally gave it to me. I was so happy! Its awesome!
 The trunk is on a rug I got at Ikea. I think I paid $19.99 for it. I liked the pattern and the price so much, I bought one in red as well. On the trunk is a rhinestone mirrored serving tray. Adorable, but I have yet to receive breakfast in bed on it.....(hint, hint).


 I also love mirrors so I have a couple of random ones in the room.
My bedspread is multiple things. First off I love blankets. On that bed currently is my sheet, my Amish quilt, two duvet blankets, and my bedspread. The bedspread set I found at Marshall's on clearance for $35. The lace cover was another great find I found in my moms stuff. Apparently it was pricey, I had never seen it, she ordered it off TV or something. I am not sure what her original plan was with it, but it is working well with my theme. I still need to add some throw pillows. I always like to wait until I find really good deals, so those are yet to come.
Also there is my makeup vanity, which is always a mess so its not pictured =)This
is still a work in progress.. The window above the bed are really
cramping my style.. I am trying to find a way to cover or incorporate
them into the whole look.
I also love mirrors so I have a couple of random ones in the room.
My bedspread is multiple things. First off I love blankets. On that bed currently is my sheet, my Amish quilt, two duvet blankets, and my bedspread. The bedspread set I found at Marshall's on clearance for $35. The lace cover was another great find I found in my moms stuff. Apparently it was pricey, I had never seen it, she ordered it off TV or something. I am not sure what her original plan was with it, but it is working well with my theme. I still need to add some throw pillows. I always like to wait until I find really good deals, so those are yet to come.
Also there is my makeup vanity, which is always a mess so its not pictured =)This
is still a work in progress.. The window above the bed are really
cramping my style.. I am trying to find a way to cover or incorporate
them into the whole look.
This is the lovely wall that made me need to revamp my bedroom style
 My bathroom is a very awkward shape. So far I have left the colors as grey and white and burlap/natural. These stars above the towels we a silver color but for this room I decided to paint them white and give them more of a nautical feel.
 The towels I got at target. For some reason during the holiday season is when I always find things I really love. The towels were in their Christmas/holiday decor. They look like everyday to me! I added burlap that I got at Micheal's.
The storage drawer stand was much needed in my small apartment. Apartments never have enough storage ever, so I had gotten this for all of my beauty supplies. I painted it grey and added some sparkles so it would match my new bathroom.
Lastly this is by the sinks. I already had both of the signs from previous decor. The middle used to be a picture of two ladies at a bar drinking martinis. I modge podged a picture of my dog and my parents dog in the middle instead. Super simple and I think looks awesome. I just printed in in black and white on card stock and modge podged it on.
I am still working on this room. It is really a trial by error for me. I have never had white anything in my life. I really like it however. It feels serene and relaxing to me. For a super busy active single mom like myself that is important!
The towels I got at target. For some reason during the holiday season is when I always find things I really love. The towels were in their Christmas/holiday decor. They look like everyday to me! I added burlap that I got at Micheal's.
The storage drawer stand was much needed in my small apartment. Apartments never have enough storage ever, so I had gotten this for all of my beauty supplies. I painted it grey and added some sparkles so it would match my new bathroom.
Lastly this is by the sinks. I already had both of the signs from previous decor. The middle used to be a picture of two ladies at a bar drinking martinis. I modge podged a picture of my dog and my parents dog in the middle instead. Super simple and I think looks awesome. I just printed in in black and white on card stock and modge podged it on.
I am still working on this room. It is really a trial by error for me. I have never had white anything in my life. I really like it however. It feels serene and relaxing to me. For a super busy active single mom like myself that is important!


